Koi College- Perfect Koi Pond
Placement and Shape
Placement:
The placement of the pond will play a very important part in your enjoyment, health of your koi, and ease of maintenance. The Koi pond should occupy your best viewing area near the home and away from trees if possible, as some of there leaves are poisons to Koi.
Shape:
The shape of the visible pond should have no dead spots for water circulation, “don’t get to creative here”. A rectangle gets the biggest bang for the buck, you can round the corners.
Deep water and volume:
The depth, There shouldn't be any shelves, the reason I say that is to keep out unwanted predators that will be able to wade into the pond and steal your fish like Blue Heron or Raccoons. So make sure the sides of the pond are straight down as possible and not sloped. We want deep water, the deeper the better. Koi exercise more swimming up and down and will have better circulation systems and body conformation. Keep the stones and rocks out of the pond; they are using up valuable volume for water. Stones and rocks make cleaning impossible unless you remove them each cleaning. Parasites and hydrogen sulfite find a home on, in and under these surfaces; use them out side the pond. Plants are better used out of the pond for the same reasons, they use more then they give. Plants have no place in a koi pond. It’s all about the Koi; they are the beauty in the water, ”They Are Your Pond Jewels”.
Bottom Drains:
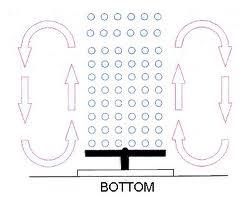
It is generally accepted that 4 inch bottom drains are a must and should be fitted to all ponds. Bottom drains are designed to be placed at the deepest part of the pond for the removal of the wastes and the settlements. Some 4" bottom drains come with aeration. Aerated bottom drains must have an air pump to work. As the drain cover gives some oxygen back to the water column it also gives off tremendous circulation and a sweeping action. Bottom drains count for the majority of the water circulation in a Koi pond. The vast majority of solids will sink to the bottom of the pond in time, where ideally, they will be sucked into the bottom drain and end up in the filter systems where they will be extracted from the water column by the vortex settling chamber then converted to nitrate by the nitrification process in the Bio-Chamber.
Note: A single drain will sweep a 6 to 7 foot radius, larger ponds need more drains. Do not install a bottom drain with less then a 4 inch outlet, smaller drains block easily and restrict flow, remember these drains are gravity fed. 1 drain 1 pipe no tees.
Bottom Drains:
Filter systems should be sized near 1/3 of the water volume. When choosing a koi pond filter you are making huge decision for the future of your fish and your pond in general. Not only do they help to keep your pond water clear, they are responsible for removing organic waste and undesirable compounds from the water. In effect, the settling Chamber and Biological Chamber on a Koi pond is really a small sewage treatment unit. If these wastes are not removed, your koi could get very sick and possibly die. With that in mind, here are some tips to help you choose the right koi pond filter. Do not get caught up all the advertising claims, these “Black Boxes” just can not deliver. Some provide zero filtration, some are mildly efficient but none can ever come close to the wishful performance claims made by manufactures. In just about every example, the small and totally inadequate box size completely hides what is really taking place. If total cleansing is required, (which is often do to size,) then the only real way to ensure that this is achieved is to manually strip the box down of all contents, wash them thoroughly and start again, usually with a complete loss of valuable bacteria. Sand filters are a nightmare and any bottle filter can never be cleaned completely, only diluted. All this is accomplished with an extreme waste of money, time and pond water.
Note: You must see the waste inside your system, and then you’ll know when to clean or when it is clean.
See this short video on how simple filtration is:
http://www.youtube.com/user/michigankoi#p/a/u/1/XoojRVLOHeQ
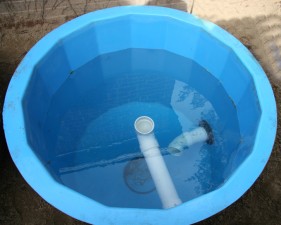
Vortex Settling Chambers:
These chambers are open to be seen and are best made of cement block and coated or Fiberglass tanks. I like fiberglass because it can be repaired or reconfigured any way one chooses. The settling chamber works best as a gravity fed system. Never pump water to settling chambers, when waste is pumped, it is emulsified, making separation thousands of times more problematic. This chamber is for removing large solids and debris coming from the bottom drain. The water enters this chamber tangentially mid tank above the cone allowing for the heavier particles to sink to the bottom and the clean water to rise to the top and move on to the Bio-Chamber. Vortex chambers should be as large as possible. I recommend at least 48 inches in diameter by 66 inches deep with a conical shaped bottom. A tank like this holds 450 gallons. The benefit of the open design is you can see the waste and when cleaning is needed. With recommended flow rates a chamber like this will be over 95% effective removing solids.
Note: I like to make these chambers with a 10 inch flat at the bottom of the cone for ease of cleaning. By having this flat and using a pump to clean, I save hundreds of dollars on pluming and labor digging a drain.
Cleaning Vortex Settling Chambers:
Shut off in coming water and then position a submersible pump ¾ down, pump out clean water to pond. Next set pump on flat bottom and pump water back on the waste to mix completely. Now pump waste water to plants or discard. Open valve allowing pond water to flush out drain and pluming, when water runs clean, shut off valve. Pump waste water to plants or discard, your chamber is now clean, open valve. You have just cleaned this open top vortex settling chamber with a small amount of water and you can see it’s clean.
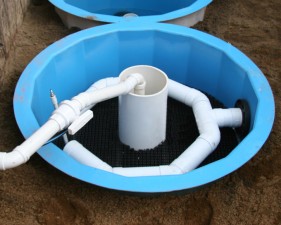
Bio-Conversion Chambers:
Clean water from top of settling chamber enters the Bio-Chamber at its top. This chamber is biologically active for breaking down dissolved toxins. The Bio-Chamber is the most customizable, it can be any shape, but size is important. I like to use a 48” x 50”, 400 gallon fiberglass chambers or larger. In this chamber I support the bio-media 12 inches off the bottom. This support holds an aeration ring to keep bio-media fully aerated for optimum performance. An additional aeration ring is used on the very bottom for the purpose of back washing the media. I’ve used just about every kind of media on the market, some are better then others. I make and use Bio-Ribbon. This media has more surface area per volume than any thing I know, the more surface area the better. This surface is where the biofilm of nitrifying bacteria live. As a gravity flow system, water inters at the top of chamber, flows down through the Bio-Media. There is a 10 inch tube going to the bottom through the center of the media, the water enters the bottom of this tube and fills with clean, bio-treated water. We pump water, from this point, for the first time since the water left the pond.
Cleaning Bio-Conversion Chambers:
Shut off in coming water and then add compressed air to lower aeration ring. Start air flow at a low setting, this will start the bubbles to dislodge any waste clinging to bio-media. Turn up air pressure and really shake media. The Dirt and waste will fall to the bottom space as well as mix with water in chamber. Position a submersible pump down the center tube and on bottom of chamber. Pump out waste water to plants or discard. Rinse media from top to fill lower chamber, agitate with air and Pump out waste water to plants or discard. Turn off air, open valve to refill with pond water, remove pump. You have just cleaned your Bio-Conversion chamber for another year. You did not remove any media or did not kill any bacterial colonies or microscopic
bacteria. Cleaning was fast and used only a small amount of water per year.
Koi Pond Aeration
A Koi pond is more than a hole in the ground with a liner and some water. In order to have a healthy, dynamic pond environment you need a source of aeration. Not only does it help with oxygen, but it also aids in circulating the water. Aeration is also very important for the biological filter. Air diffusers in the biological filter aid beneficial bacteria to flourish therefore provide you with healthier Koi and water parameters. It is important to note that all of these elements must work in harmony with one another. The filtration system purifies the water of wastes, bacteria and other toxins. An aerator supplies air to the water so the fish will have oxygen and the water does not stagnate. The pump moves the water through the filter. This cycle is the lifeblood of a Koi pond, summer and winter. Add as much air to your pond as you can with air pumps and air diffusers to distribute the air (highly recommended for ponds that are heavily stocked). Use an air pump during hot weather to provide the necessary oxygen within the pond; Oxygen concentrations are lowest at dawn and highest during late afternoon. The amount of oxygen in pond water can vary considerably from pond to pond and from hour to hour. During the winter a pond aerator will keep an opening in the ice, add oxygen and help gas off toxins.
Myth: The use of small stock tank heaters are a good thing, they keep a hole in the ice for oxygen exchange.
Fact: Yes, they may keep a hole in the ice but there’s not much oxygen exchange. The surface of the water has to be broken for this exchange. A 1500 watt stock tank heater cost $657.00 to operate the winter and only keeps a hole in the ice heating Michigan. On the other hand, A 20 watt diaphragm air pump with a 14 inch membrane diffuser will keep a hole in the ice, raise toxins off the bottom, degas the carbon dioxide, and raise oxygen levels and circulate the water all for only $8.76 all winter.
Note: At Michigan Koi, we think the best place in any pond system to add air or oxygen is directly into the bio-conversion system as close a possible to where the bacteria are sitting. This is why vortex chambers and Bio-Ribbon filled Bio-Conversion Chambers work so fantastically well together in any serious Koi pond. Aerated bottom drains maximize pond circulation and sweep bottom debris towards the bottom drain to be filtered out.
Choosing The Right Pump:
SURELY THE HEART OF EVERY POND HAS TO BE THE PUMP…
Just as our own heart is our own pump...
The pond pump is the heart of the Koi pond. Pond and waterfall pumps not only create the pleasant effect of running water but also aerate the pond and circulate water through the filtration system, keeping it clean. There are many different types of pond pumps defined by what function they serve. I will only cover Koi pond pumps here.
Choosing the right pump is an extremely important decision and if you get it wrong then you will either have to change it or more likely loose you’re valuable Koi through pumping not enough water, electrical shock, and oil or noise contamination. Choosing the right water pump for your Koi pond can make all of the difference in the world.
Just because a pump may cost less to buy, it is not always the way to go.
The most important thing to remember is the electrical usage when looking for a water pump for your Koi pond.
In order to maintain a healthy environment for your pond, you MUST run your water pump through your filter 24 hours a day, 7 days a week.
So it is important to pick the right water pump. Water pumps have variances in electrical usage and electrical costs.
The following formula will assist you in determining how much you will spend (approximately) per month to run the pump you select.
Formula:
• Amps x Volts = Watts
• Watts x 744 and divide by 1000 = KWH per month
• KWH per month x Cost per KWH (located on your electric bill) = Cost per month
CLICK to use our handy pump cost calculator.
Example A: swimming pool or spa pump may pump 3000 gallons per hour and use 12Amps @ .10 per KWH = $3.16 per day, $96.31 per Month or $1156.32 per year.
Example B: Energy efficient Koi pond pump may pump 3500 gallons per hour and use only 1.3 Amps @ .10 per KWH = Cost .34 per day, $10.43 per Month or $125.27 per year.
Fact: This happened to me and I run 4 pumps all year 24 hours a day and 7days a week.
My numbers were: $12.64 per day, $385.24 per Month and $4625.28 per year.
I changed to energy efficient pumps: Cost $1.36 per day, $41.72 per Month or $501.08 per
This was a savings of $4124.24 enough to buy 8 energy efficient pumps.
First, a koi pond should not be plumbed like a swimming pool. A swimming pool uses a low volume, high pressure water system, small pipes and big pumps. Your pond should be low pressure, high volume, use pipe with an inside diameter of at least 2" going to the pump, and 2" or even greater diameter leaving the pump. Low pressure, high volume is better achieved with a smaller pump than with the ones normally associated with swimming pools and spas. Realize, too, that the pump should run 24 hours a day. For most applications, if your pump requirement is greater than one-quarter horsepower, you probably have a plumbing or filter problem which should be rectified. In addition, the right pump, properly plumbed, can save 50 percent or more per month in electricity over the wrong one.
Locate the pump as close to the source as possible. It is best to have your main run of pipe on the discharge side of the pump.
A Few Good Pump Rules
1. Install the pump outside the pond, and below the level of the surface of the pond to create flooded suction. This will help to ensure a proper supply of water to the pump. Remember, a pump can't pump out water if there isn't any available. Even if your supply line comes up and over the top of the pond wall, it will still offer a flooded suction if it has no breaks to atmosphere before it goes back down below the surface level.
2. If it is not possible to provide a flooded suction installation then: position the pump as low as possible, and as near the source as possible. Install a priming pot on the inlet of the pump. Install a foot valve, or a check valve in the inlet line below the water level. Always prime the entire inlet line, priming pot, and pump before turning it on.
3. Always have your inlet pipe diameter equal to or larger than the discharge line to use. I would suggest a minimum of two inch line on the inlet side of the pump and two inch line on its discharge side for flow rates of up to 50 gallons/minute.
4. Use a gravity flow filtration system that does not require pressure. It costs money to create pressure. This type system works best anyway.
5. Use large enough pipe to minimize friction loss. You receive no benefit from fighting friction. It is much better to spend a little more money on the pipe initially, than to continually spend more money on electricity to produce pressure to fight friction. I suggest keeping your friction losses to less than 10 feet per 100 feet of pipe. It costs money to create pressure. The longer the run of pipe you use, the more critical this is. The inlet and discharge port sizes of the pump do not dictate the proper pipe diameter. 6. Choose a pump that can give you the required flows at the lowest possible amp draw and its effect on your monthly utility bill can be significant.
7. If more flow than a single pump can produce is required, use two or more units in parallel. This also offers the benefits of being able to vary the flow rates, ensure partial flow if one pump needs servicing, and can often save a substantial amount of electricity compared to using one very large pump.
8. Never run a pump dry. This will damage the seal and impeller. They are designed to pump fluid, not air. Ensure the pump is full of water before you turn it on, and that it doesn't out pump the supply.
9. Shelter the pump and motor unit. They will last much longer when protected from rain and rust. The covering should still allow the unit to have suitable air circulation for proper cooling.
10. Install shutoff valves before and after the pump, so you can easily remove it from the line without having to drain your system.
11. Use Teflon paste (not tape) for sealing threaded joints.
12. Head pressure takes into account the resistance of vertical lift, the length of the pipe you're using, the fittings that are in place, and more.